Sunday, April 29, 2012

Peanut Butter Chocolate Chip Cookies

Pin It Now!
I made these this afternoon.  They turned out perfectly if I may say so myself.  Me and baking cookies usually do not get along.  I always have trouble with cookies, especially chocolate chip cookies, spreading out too much and becoming chocolate chip cookie crisps.  I found this recipe through Pinterest on Mel's Kitchen Cafe.  They did not spread out, but remained plump and cakey, just like I like them.  I took Mel's advice and used a combination of semi-sweet chocolate chips and Reese's peanut butter chips to add that extra kick of peanut butter.  


1 cup (16 tablespoons) butter, softened to room temperature
2 cups smooth or chunky peanut butter
1 ½ cups firmly packed light brown sugar
1 cup granulated sugar
2 large eggs
1 ½ tablespoons milk
1 ½ teaspoons pure vanilla extract
2 ½ cups all-purpose flour
1 ½ teaspoons baking soda
1 teaspoon baking powder
½ teaspoon salt
2 cups chocolate chips (or a combination of peanut butter and chocolate chips)

1.  In a large bowl, combine butter and peanut butter.  Use an electric or stand mixer to beat them until they are light and fluffy.  Add the brown sugar and white sugar.  Combine.  Add the eggs, milk, and vanilla.  Beat until the batter is light and fluffy, about 1 to 2 minutes.

2.  Sift together the flour, baking soda, baking powder, and salt.  Add to the butter mixture.  Mix until most of the flour is incorporated.  Add chocolate chips and finish combining.  Allow the cookie dough to sit for about 15 minutes.  The dough will become more firm.  

3.  Preheat oven to 350º F.  Line cookie sheets with parchment paper.  Scoop about 1 inch balls of dough on the cookie sheets.  (I used a cookie scoop to get equal sizes).  Bake about 7 minutes until gold brown.  Remove from the oven.  Allow to cool about 4 minutes and then transfer to cooling rack.  

Makes about 5-6 dozen cookies.  (It made a lot of cookies.  I am glad they turned out yummy.)

Saturday, April 28, 2012

Blueberry Muffin Crumble Cake

Pin It Now!
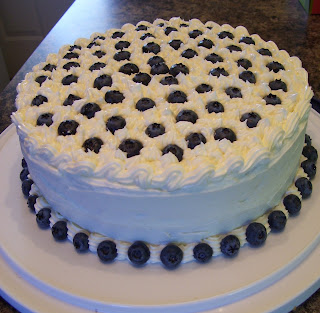
I have made this cake twice now and both times it has been a winner.  This cake is from Anne Byrn's book, The Cake Mix Doctor Returns!  The cake is a layered cake with a glaze icing drizzled over it and between the two layers.  The cake has a crumble topping that adds an interesting texture between the two cakes.  I followed the directions for the cake, but used Ann Byrn's Lemon Cream Cheese Frosting from the same book instead of the glaze.  The first time I made it was for a baby shower, so I decorated the cake with colored icings.  This was the second time and I was inspired by the blueberries left over from baking.  They provided a nice pop in the mouth when taking a bite.  


Vegetable oil spray, for misting the pans
Flour, for dusting the pans (I use Pam with flour in it)
 
1/2 cup all-purpose flour
1/2 cup packed light brown sugar
4 tablespoons (1/2 stick) cold butter
1/2 cup finely chopped pecans

1 3/4 to 2 1/4 cups fresh blueberries (thawed frozen blueberries work as well)
1 medium-size lemon
1 package (18.25 ounces) vanilla or yellow cake mix with pudding in the mix
1 container (6 ounces; 3/4 cup) lemon yogurt
1/2 cup water
1/3 cup vegetable oil
3 large eggs

1. Rinse the blueberries and pat them dry. Place oven rack in the center of the oven. Preheat oven to 350º F. 

2.  Prepare the pans.  Use two 9-inch cake pans and trace the bottoms using a pencil on parchment paper.  Cut out the circles.  (I cut on the inside of the line so that the circles aren't too big.)  Spray the bottoms of the pans.  Place parchment paper in the pan.  Spray parchment paper and sides of the pan.

3.  Place the flour and brown sugar in a medium bowl.  Mix well.  Cut the butter into small pieces and cut into the flour mixture using a fork or pastry blender.  Cut the mixture until it resembles coarse crumbs.  Add the pecans to the mixture and toss to combine.  Divide the topping mixture into two parts and put each half into the prepared pans.  Spread an even layer over the bottom.  Set pans aside.  

4.  Rinse the lemon and pat it dry.  Grate 1 teaspoon of lemon zest.  Cut the lemon in half and squeeze the juice into a small bowl.  You will need 1 tablespoon.

5.  Measure out 1 tablespoon of the cake mix and set aside.  Place remaining cake mix and the yogurt, water, oil, eggs, 1 tablespoon lemon juice, and 1 teaspoon lemon zest into a large mixing bowl.  Beat with an electric mixer on low speed until the ingredients are incorporated, 1 minute.  Stop the mixer and scrape down the sides of the bowl with a rubber spatula.  Increase the mixer speed to medium and beat for 2 minutes longer, scraping down the sides as needed.  The batter should look well blended.  


6.  In a small bowl combine the blueberries and reserved dry cake mix.  Toss them until they are evenly combined.  Fold the blueberries into the cake batter until just evenly combined.  Evenly divide the cake batter between to the pans.  Spread the batter evenly to the edges.  Place in the oven side by side.  


7.  Bake cakes until they are golden brown about 24 to 28 minutes or until a toothpick comes out clean.  I usually set my timer for about 5 minutes less than the time and watch it from there.  (I don't always trust my oven and I hate overdone cake.  May as well eat sweet cornbread at that point.)  *When watching the cake, don't keep opening the oven, but watch through the window.  


8.  Allow the cakes to cool for about 15 to 20 minutes.  Turn the cakes out topping side up onto cooling racks.  Allow to cool 20 minutes longer.  (If using the Lemon Cream Cheese icing, allow to cool completely; about 3 hours)

For the glaze:

1 tablespoon lemon juice
1 1/2 cups confectioners' sugar, sifted
3 to 4 tablespoons milk


Whisk the confectioners' sugar and lemon juice in a small bowl.  Add 1 tablespoon of milk at a time until the glaze is smooth but still runny enough that it will slowly drip down the sides of the cake.  


To assemble the cake with the glaze:


Transfer one layer, topping side up to a serving platter.  Using a spoon, drizzle half of the glaze over the cake and allow it to drip over the edge.  Place the second layer on top of the first topping side up and drizzle remaining glaze over it.  Garnish the cake with blueberries if desired.


For the Lemon Cream Cheese Frosting:
4 ounces reduced-fat cream cheese, at room temperature
8 tablespoons butter, at room temperature
About 4 cups confectioners’ sugar
1 tablespoon lemon juice
1 teaspoon lemon extract
 

In a large mixing bowl place cream cheese and butter.  Using an electric mixer combine the butter and cream cheese until just mixed.  Add confectioners’ sugar, lemon juice, and lemon extract.  Mix on low at first until the confectioners’ sugar is combined.  Increase speed to medium and mix until the frosting is light and fluffy, about 2 minutes.
 

To assemble the cake with the frosting:

Transfer a cake layer topping side up to a serving platter.  Place a dollop of frosting, about 3/4 cup, in the middle of the layer.  Spread the frosting evening over the cake using a cake spatula or butter knife.  Transfer second cake layer, but turn topping side down.  Spread remaining frosting over the top and sides of the cake.  Decorate as desired.

Cake decorating tips:

I like to double the frosting recipe so that I have plenty of frosting.  I do this with any cake frosting recipe. 

When assembling the cake, I first apply a crumb coat.  A crumb coat is a very thin layer of icing and catches the crumbs so they don’t show up in your final coat.  After applying the crumb coating, refridgerate for 20 to 30 minutes.  Then, frost with your final coat. 

For a smooth appearance, I apply the final coat and then refridgerate for 20 to 30 minutes.  I place my cake spatulas into hot water and use the heat of the spatulas to smooth the surface of the icing. 

I piped shells at the bottom and along the top edges.  On the top, I piped stars.


Thursday, April 26, 2012

Garlic Pork with Tomato and Basil

Pin It Now!
This is one of my all-time favorite recipes.  I think I could eat it every week.  I got this recipe from Cooking Light, April 2006.  As you will notice, many of my regulars originated with Cooking Light.  
This dish packs a spicy yet tangy bite that can only come from Sriracha.  I like to add a little extra in for that extra kick.  The recipe calls for pork tenderloin (which is the best type of meat for a stir fry), but I will also use pork chops or pork shoulder if I have that in the freezer.  I also double the quantity of tomatoes and the sauce in this recipe.  (Shhh...don't tell anyone, but I like this sauce.)  With doubling the tomatoes, I also have to add an additional teaspoon of cornstarch due to the extra juice produced by the tomatoes.  I usually eat this with a steaming bowl of sushi rice (which only took me three years to perfect) and Garlic Green Beans.  I will post that recipe soon.  

12 ounces pork tenderloin, thinly sliced
2 tsp. cornstarch
1/4 tsp. salt
1/8 tsp. black pepper
3 tablespoons cold water
2 tablespoons oyster sauce (doesn't taste fishy; kind or sweet; kind of salty; essential!)
1 tsp. sugar
1 tsp. Sriracha (hot chile sauce, such as Huy Fong)
2 tsp. peanut oil (I use vegetable oil)
2 tsp. minced fresh garlic (I get a little garlic happy,and add more)
1 tsp. minced ginger (not originally in the recipe, but goes very well with pork)
2 cups chopped seeded plum tomatoes (about 3 tomatoes)
3/4 cup chopped fresh basil
1/4 cup chopped green onions (about 2 onions)


1.  Slice pork.
2.  Combine water, oyster sauce, sugar, Sriracha, and cornstarch in a small bowl.
3.  Heat oil in a large nonstick skillet (or Wok) over medium-high heat.  Add minced garlic, ginger, and pork.  Saute 3 minutes or until the pork is done.  
4.  Add chopped tomatoes, salt, and pepper.  Saute 1 minute.  Add cornstarch mixture; cook 1 minute or until thickened.  Add basil; stir to combine.  Remove from heat, and sprinkle with onions.  Serve with steamed rice.


Spaghetti with Two-Cheese Sauce

Pin It Now!
This was dinner tonight, though mine didn't look this photogenic.  I used this recipe from Cooking Light's July 2011 magazine.  I made a few changes (as always) based on the ingredients I had on hand.  I used regular thin spaghetti for the pasta opposed to the linguine called for in the recipe.  I also substituted low-fat ricotta cheese for the mascarpone cheese.  With this substitution, I not only get to save on calories, but I also get to save a few dollars.  Some other suggestions would be to add some cubed, precooked chicken breast, substitute regular pasta for whole grain, or add some cooked zucchini or summer squash.  The recipe was very simple and quick, just like advertised in the magazine.  

8 ounces uncooked linguine (or thin spaghetti)
1 cup 1% milk
2 tablespoons chopped fresh basil divided
1/2 tsp. salt
1/8 tsp. black pepper
1 tablespoon extra-virgin olive oil
1 tablespoon all-purpose flour
1/2 cup shaved fresh Parmigiano-Reggiano cheese, divided
1 1/2 tablespoons mascarpone cheese (or ricotta cheese)

1.  Cook pasta according to package directions, omitting salt and fat.  Drain; keep warm.
2.  While pasta cooks, combine milk, 2 teaspoons basil, salt, and pepper in a bowl; stir milk mixture with a whisk.
3.  Heat a small saucepan over medium heat.  Add oil to pan, swirl to coat.  Add flour to pan, and cook for 2 minutes, stirring constantly.  (It may not take all of 2 minutes, but cook the flour until it begins to change color) Add milk mixture; cook for 3 minutes or until slightly thickened, stirring frequently.  (The basil likes to stick to the whisk)
4.  Remove from the heat, and add some of the Parmigiano-Reggiano cheese, reserving some for sprinkling on top of each plate, and the mascarpone cheese to the milk mixture.  Add cheese mixture to pasta; toss to combine.  Sprinkle with remaining basil.  

Yield: 4 servings (1 cup pasta mixture)